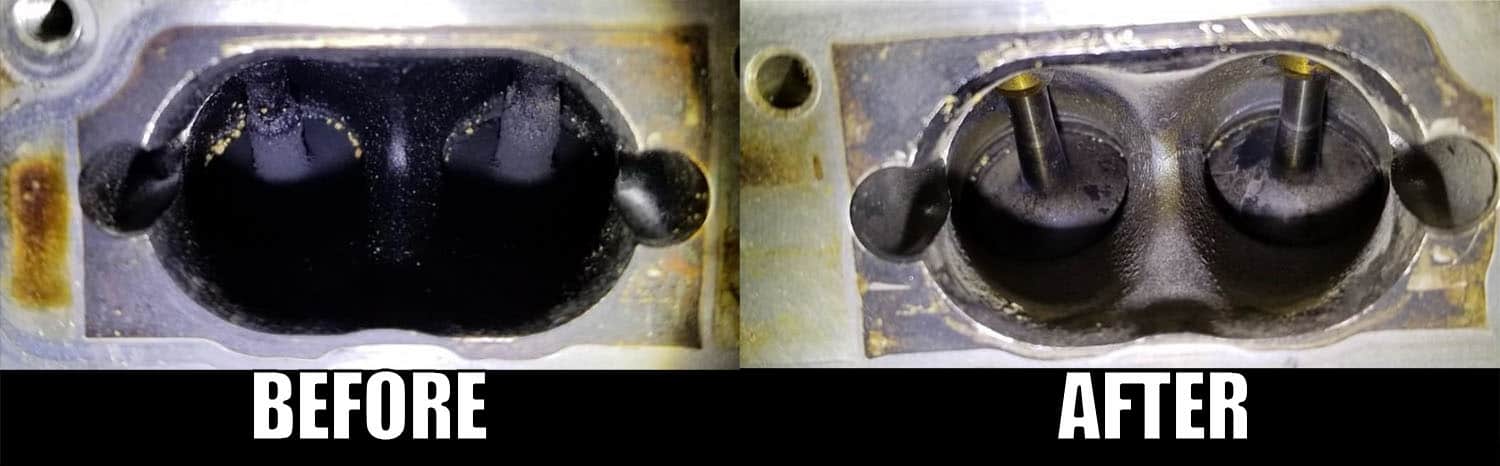
Has your direct injection engine been sputtering, slow or jumpy to accelerate, or just not performing right? Carbon buildup can be significant. We’ve been using walnut shells to clean excess carbonization from GDI (Gasoline Direct Injection) engines for years, and you can clearly see the difference in the photo above. To schedule a cleaning for your vehicle, call us.
Our certified technicians have seen significant buildup happening much faster these days than before, and it can cause performance and gas mileage issues, even misfires. In extreme cases, you can even experience knocking and sticking valves. It's important to take care of this on a regular basis, and we’re confident this method is the quickest and most affordable way to deal with the buildup that is inherent on newer engines.
Factors Contributing to Carbon Buildup in Direct Injection Engines
- Fuel Placement:
- In port-injected engines, fuel is sprayed onto the intake valve, which effectively cleans off any potential carbon deposits before the fuel-air mixture enters the combustion chamber.
- Fuel is injected directly into the combustion chamber, bypassing the intake valves. This means the intake valves don't get "washed" with fuel, allowing carbon deposits to accumulate over time.
- Oil Vapor and Blow-by:
- Blow-by—when a small amount of combustion gases bypass the piston rings and enter the crankcase—causes the oil in the crankcase to vaporize slightly. To maintain proper pressure, the crankcase vapors laden with oil particles are recirculated back into the intake manifold through the Positive Crankcase Ventilation (PCV) system.
- In direct injection engines, these oil vapors can settle on the intake valves and solidify, leading to carbon buildup. Since the intake valves in GDI engines aren't washed with fuel, these deposits remain and accumulate over time.
- Combustion Conditions:
- GDI engines can operate with a leaner fuel-to-air mixture than port injection engines, meaning there's more air in proportion to fuel during combustion. While this improves fuel efficiency, it also raises combustion temperatures.
- Higher temperatures can cause oil particles from the PCV system to "bake" onto the intake valves more readily.
- Incomplete Combustion:
- Occasionally, not all of the fuel-air mixture in the combustion chamber gets burned. The remnants, which contain unburned hydrocarbons, can be sucked back into the intake manifold during the intake stroke, especially when the engine is decelerating.
- Then, these hydrocarbons can adhere to the intake valves, contributing to the carbon buildup.
- Short Trips and Infrequent Maintenance:
- Engines often used for short trips may not reach optimal operating temperatures, which can exacerbate carbon buildup. If regular maintenance intervals (like oil changes) aren't followed, oil quality can degrade, increasing the potential for deposits.
To mitigate the carbon buildup issue in direct injection engines, some automakers have adopted dual injection systems that combine both port and direct injection. This approach attempts to capitalize on the benefits of GDI while using port injection's cleaning action to reduce carbon deposits on the intake valves.
Like to DIY?
Using walnut shells to clean carbon deposits from direct injection engines, particularly from intake valves, has become a recognized method in the automotive world. The process is referred to as "walnut blasting." The principle behind this is that crushed walnut shells are hard enough to remove carbon deposits without damaging the metal parts of the engine.
Here’s a generalized overview of the process:
Materials Needed
- Walnut shell blasting media (fine to medium grade)
- Media blaster with a proper attachment to access the intake valves
- Shop vacuum
- Appropriate PPE (safety glasses, gloves, mask, ear protection)
- New intake manifold gaskets (recommended)
Steps
- Safety First – Ensure that you’re wearing appropriate personal protective equipment.
- Preparation – Disconnect the battery. Remove any engine components obstructing access to the intake manifold. This might include air intake tubes, various hoses, or even the fuel rail and injectors.
- Remove the Intake Manifold – After gaining access, remove the intake manifold to expose the intake ports and valves. Note: Every vehicle is different; consult a service manual for specific instructions related to your vehicle.
- Inspect the Valves – Before proceeding, inspect the intake valves to determine the level of carbon buildup.
- Prepare for Blasting
- Seal off any open ports or tubes to prevent walnut shells from entering unwanted areas.
- Insert the blasting nozzle into the intake port. It's beneficial to have a nozzle designed to contour around the valve to ensure effective cleaning.
- Position a shop vacuum nozzle near the blasting nozzle to catch the majority of the used walnut shells and loosened carbon.
- Begin Blasting – Turn on the media blaster and begin directing the walnut shells at the carbonized areas. Move the nozzle systematically to ensure even cleaning. The shop vacuum should run simultaneously to capture debris.
- Inspect and Repeat – After a period of blasting, stop and inspect the valve. If carbon remains, repeat the process until the valve is clean.
- Clean Up – Once all the valves are clean, use the shop vacuum to remove any remaining walnut shells from the intake ports and surrounding areas.
- Reassemble the Engine – Replace the intake manifold gasket (this is generally recommended to ensure a proper seal). Reinstall the intake manifold and any other components removed during the process. Reconnect the battery.
- Start the Engine – After everything is reassembled, start the engine and let it idle for a few minutes. Check for any unusual noises, leaks, or issues.
It's crucial to ensure that no walnut shells remain in the engine after cleaning, as they could cause damage if ingested into the combustion chamber. Always consult the service manual specific to your vehicle model before undertaking such a task. If you're unsure about any step, bring your vehicle into a CMD location near you.